


How to set up SES on AWS so you can send emails from Rails cheaply in production
19 May 2015
Sending emails from Rails is not that hard, but keeping them out of user's spam folders can be difficult. The first time I set up a production rails app as an MVP for a project, a significant number of users didn't complete sign up because the account confirmation email went straight to their spam folder. There are a lot of reasons this can happen, and a fair number of tools online that will tell you what they are. Fixing the issues often involves sending mail through a delivery partner so that bounces and sender reputation are handled cleanly, but the providers vary a lot in what they offer.
Sendgrid offers a lot of nice features, but is relatively expensive, so why use it if you're just sending simple emails and don't need the extra features? SES on AWS is roughly ten times cheaper, so can be a very good option, but the setup is a lot more complex. Your app requires specialist bounce handling before they'll let you send real emails outside of the sandbox, so you need to write a fair bit of code. The idea is that when an email address is dead, your app hears about it via the bounce notification and stops sending emails to it. Without this, both you and AWS are going to get a reputation as spammers, and your deliverability will suffer so it's a good thing that they insist on this.
This post will show you how to get it working. Before you start, you'll need:
- An AWS account with admin access
- A production Rails app hosted live under the production domain name
- HTTPS set up and working for your production app with a valid certificate
- Administrator access to the domain registrar account for the production domain.
- Access to emails that are sent to the 'from' address that is set up in your app
Step 1: Set the IAM SMTP user and add the credentials to your action mailer config.
To send email from Rails, you need an SMTP username and password.
To get this for SES, start by logging into the AWS management console and head to the SES section.
Then, go to SMTP Settings and click the Create My SMTP Credentials button.
Working through the steps it presents, you can accept the defaults and it will
give you a new IAM user with a username and password combination
(More info here).
Make a note of these, and add them to your production application's SMTP settings.
Step 2: Verify your domain and enable DKIM.
Now we have to prove to AWS and others that your domain is actually yours and that you're not a spammer. This is key to keeping your mails in the inboxes of your recipients where they belong.
Add your production domain to the list on the Domains page within the SES
section. To do this, click the Verify a New Domain button, enter the domain name,
and make sure you tick the Generate DKIM Settings box. If you don't know why DKIM matters, you
can get a pretty good overview from Wikipedia here.
In short, it makes it harder for spammers
to send messages that look like they're from your domain when they're not.
In the next stage, AWS will show you some DNS records that you will need to add to your existing DNS records with your registrar. Your registrar will have their own instructions for how you can do this, so the next step is to find these instructions and follow them. More information on the process is in the AWS docs here.
Domain verification is automatic and can take some time. For me it was a couple of hours. Once it's done, make sure you turn on the DKIM setting for the domain in the SES settings.
Step 3: Verify your from address.
Similarly, AWS need to know that you're not maliciously sending email with
someone else's account as the from address.
You should have the address you want to use set up in Rails already. Something
like [email protected]. This appears in the SMTP settings (or in your mailers).
Go to the Email addressed page in the SES settings
and click the Verify a New Email Address button. This is pretty straightforwards -
you just click on the confirmation link in the email you receive. However, it's possible that
the address does not have a mailbox, so you will need to make one first, or get it
to forward messages to your personal address temporarily.
Once this is done, turn on DKIM for that address too.
Step 4: Add an SNS topic and add your own email address to it
We now need a way for the bounces to be routed to your app, and SNS is the way AWS handles this. Adding your own email to start with means that bounce will be forwarded to you so you can verify that the SNS topic is working.
Go to the SNS section of the AWS console, click on the Topics link, and then Create a new topic.
Do this twice, once for yourapp_bounces, and once for yourapp_complaints.
For each of them, click on the link in the list that starts with 'arn', then click Create subscription,
then choose email and enter your personal email address. This is just for testing, so remember to remove
this afterwards.
You are now ready to test that the bounce and complaint handling will pick up correctly when your app sends mail.
Go to your app and do whatever it takes to get an email sent to the bounce and complaint testing addresses that you can find here. You should find that the SNS topic sends a notification to your personal email address informing you of the problem.
Step 5: Add bounce handling in your app.
To stop future emails being send to dead addresses, your app needs to store a record of the email having bounced and will mark the address as invalid. The process is:
- SNS should call a HTTPS post endpoint in your app (instead of sending an email to you)
- The endpoint verifies that it's really AWS using the AWS SDK (certificate signing)
- The email address is then marked as being a bounce in your app's DB
- Your app's mailers always check this list before sending
It's a good idea to make sure that you and your users can see the bounces and complaints in the application UI somewhere, otherwise you'll get users filing bug reports if they've misspelled their email.
Here's the code I used to implement the bounce mechanism:
Controller Tests
These are just a guide. You may not be using Rspec or VCR (maybe you should :), but this shows the general idea.
require 'rails_helper'

describe EmailResponsesController do
  let(:user) { create :user }
  let(:other_user) { create :user }

  describe 'POST bounce' do

    let(:bounce_json) do
      %q{
        {
          "Type" : "Notification",
          "MessageId" : "2d222228-90e1-5ba1-9784-9c60222222e5",
          "TopicArn" : "arn:aws:sns:eu-west-1:863122222282:yourapp_bounces",
          "Message" : "{\"notificationType\":\"Bounce\",\"bounce\":{\"bounceSubType\":\"General\",\"bounceType\":\"Permanent\",\"bouncedRecipients\":[{\"status\":\"5.1.1\",\"action\":\"failed\",\"diagnosticCode\":\"smtp; 550 5.1.1 user unknown\",\"emailAddress\":\"[email protected]\"}],\"reportingMTA\":\"dsn; a6-26.smtp-out.eu-west-1.amazonses.com\",\"timestamp\":\"2015-01-21T00:37:34.429Z\",\"feedbackId\":\"00000122222225fb-9a217d45-8eed-4403-b7d9-172222222be7-000000\"},\"mail\":{\"timestamp\":\"2015-01-21T00:37:33.000Z\",\"source\":\"[email protected]\",\"destination\":[\"[email protected]\"],\"messageId\":\"000222222222429c-49e59593-7f16-44e3-b5a2-1a222222222c6-000000\"}}",
          "Timestamp" : "2015-01-21T00:37:34.452Z",
          "SignatureVersion" : "1",
          "Signature" : "ZmtUp+wmfSNUW0dGkzVN9A9Q7R88KwfU32zXTHn43pppZAd6pJlwKRdH/B9Ui4M1Sd1gC1Zi2WgLtC2Xi7kf60bdi66a222222222222QKeRy1GbqWfT9kcOvm4aAFlRy0FoDu2FD9iyGPu62RsABlNzLYGNI1YnmIKwHSXXy/St4MMwwGjGLprZsRSSimM/B9VJr5WCzwMmKYr/kWGVr3pN8B5WMRuFw0pYBIemJoZugkHElEypz8KNVRxSwRN3Iz7me38mMDPCs1xiv/6IyNQXu1pdtEWkAPb26feK3SuBpPNpTQtbnaZvt7wNSw==",
          "SigningCertURL" : "https://sns.eu-west-1.amazonaws.com/SimpleNotificationService-d6d622222222222222221f4f9e198.pem",
          "UnsubscribeURL" : "https://sns.eu-west-1.amazonaws.com/?Action=Unsubscribe&SubscriptionArn=arn:aws:sns:eu-west-1:82222222222282:yourapp_bounces:222222224f-7a0a-4e07-b34d-4a662222222226"
        }

      }
    end

    let(:invalid_bounce_json) do
      %q{
        {
          "Type" : "Notification",
          "MessageId" : "2222222222228-90e1-5ba1-9784-9c2222222222225",
          "TopicArn" : "arn:aws:sns:eu-west-1:862222222282:yourapp_bounces",
          "Message" : "{\"notificationType\":\"Bounce\",\"bounce\":{\"bounceSubType\":\"General\",\"bounceType\":\"Permanent\",\"bouncedRecipients\":[{\"status\":\"5.1.1\",\"action\":\"failed\",\"diagnosticCode\":\"smtp; 550 5.1.1 user unknown\",\"emailAddress\":\"[email protected]\"}],\"reportingMTA\":\"dsn; a6-26.smtp-out.eu-west-1.amazonses.com\",\"timestamp\":\"2015-01-21T00:37:34.429Z\",\"feedbackId\":\"0000022222222222fb-9a217d45-8eed-4403-b7d9-17222222222227-000000\"},\"mail\":{\"timestamp\":\"2015-01-21T00:37:33.000Z\",\"source\":\"[email protected]\",\"destination\":[\"[email protected]\"],\"messageId\":\"0000022222222222c-49e59593-7f16-44e3-b5a2-1222222222226-000000\"}}",
          "Timestamp" : "2015-01-21T00:37:34.452Z",
          "SignatureVersion" : "1",
          "Signature" : "ZmtUp+wmfSNUW0dGkzVN9A9Q7R88KwfU3222222222222gC1Zi2WgLtC2Xi7kf60bdi66aY/R76EV80xL/Znfn9YYQKeRy1GbqWfT9kcOvm4aAFlRy0FoDu2FD9iyGPu62RsABlNzLYGNI1YnmIKwHSXXy/St4MMwwGjGLprZsRSSimM/B9VJr5WCzwMmKYr/kWGVr3pN8B5WMRuFw0pYBIemJoZugkHElEypz8KNVRxSwRN3Iz7me38mMDPCs1xiv/6IyNQXu1pdtEWkAPb26feK3SuBpPNpTQtbnaZvt7wNSw==",
          "SigningCertURL" : "https://sns.eu-west-1.amazonaws.com/SimpleNotificationService-d6d6792222222222222222222229e198.pem",
          "UnsubscribeURL" : "https://sns.eu-west-1.amazonaws.com/?Action=Unsubscribe&SubscriptionArn=arn:aws:sns:eu-west-1:8622222222222222:yourapp_bounces:28222222222224f-7a0a-4e07-b34d-422222222222f6"
        }

      }
    end

    it 'creates a new bounce record' do
      expect {
        VCR.use_cassette 'check_sns_message' do
          post :bounce, bounce_json, format: :json
        end
      }.to change(EmailResponse, :count).by(1)
    end

    it 'saves the information it should' do
      allow(EmailResponse).to receive(:create)
      expect(EmailResponse).to receive(:create).with(hash_including(email: '[email protected]', response_type: 'bounce', extra_info: "status: 5.1.1, action: failed, diagnosticCode: smtp; 550 5.1.1 user unknown"))
      VCR.use_cassette 'check_sns_message' do
        post :bounce, bounce_json, format: :json
      end
    end

    it 'fails if it cannot verify the message' do
      expect {
        VCR.use_cassette 'check_sns_message' do
          post :bounce, invalid_bounce_json, format: :json
        end
      }.to change(EmailResponse, :count).by(0)
    end
  end

  describe 'POST complaint' do

    let(:complaint_json) do
      %q{
        {
          "Type" : "Notification",
          "MessageId" : "092cf767-9156-5244-b2d5-ba2222225436",
          "TopicArn" : "arn:aws:sns:eu-west-1:8622222222243:yourapp_email_complaints",
          "Message" : "{\"notificationType\":\"Complaint\",\"complaint\":{\"complaintFeedbackType\":\"abuse\",\"complainedRecipients\":[{\"emailAddress\":\"[email protected]\"}],\"userAgent\":\"Amazon SES Mailbox Simulator\",\"timestamp\":\"2015-01-21T12:56:53.000Z\",\"feedbackId\":\"0000014b022222e7-f934da45-a45c-11e4-9559-192222eb80f1-000000\"},\"mail\":{\"timestamp\":\"2015-01-21T12:56:52.000Z\",\"source\":\"[email protected]\",\"destination\":[\"[email protected]\"],\"messageId\":\"0000014b0c911fd2-c7eb049f-f610-4b56-6541-2e2222249521-000000\"}}",
          "Timestamp" : "2015-01-21T12:56:54.396Z",
          "SignatureVersion" : "1",
          "Signature" : "u7u/zeRG5KC3K7CpXll22222fwbrAGMn9rZZTTxmy2vrIyioEpIXtCaT6MhjUum2erYBi0Doo8K0/nmD+vNJMK43+IGtqsjQZeEwtr6cWDDJyrxoX53a18fp9YqBNTzwvu9TOkTNn3fUhqbumw9fH1+ltQ3qeDRP1DrpkJczQ080cZPmkF2xeDL2222IDlZJJkWpvivIrt9ZBS/lW4HU0UpjvHVAZhxgZyUoWuRMOM7j3q3aRh/RB9aHOOAw8wdfg5ie8vHSbcEOVdj2fakGfUM3kCVrgm983AjJt2SA==",
          "SigningCertURL" : "https://sns.eu-west-1.amazonaws.com/SimpleNotificationService-d6d679a1d2222522222222222198.pem",
          "UnsubscribeURL" : "https://sns.eu-west-1.amazonaws.com/?Action=Unsubscribe&SubscriptionArn=arn:aws:sns:eu-west-1:863132222282:yourapp_email_complaints:0222222c-d183-45d8-b0ac-787d02222084"
        }
      }
    end

    let(:invalid_complaint_json) do
      %q{
        {
          "Type" : "Notification",
          "MessageId" : "092cf767-9156-5244-b2d5-ba5222222d80",
          "TopicArn" : "arn:aws:sns:eu-west-1:863122222282:yourapp_email_complaints",
          "Message" : "{\"notificationType\":\"Complaint\",\"complaint\":{\"complaintFeedbackType\":\"abuse\",\"complainedRecipients\":[{\"emailAddress\":\"[email protected]\"}],\"userAgent\":\"Amazon SES Mailbox Simulator\",\"timestamp\":\"2015-01-21T12:56:53.000Z\",\"feedbackId\":\"0000014b0c9126e7-f922222b-a16c-11e4-9559-122221eb80f1-000000\"},\"mail\":{\"timestamp\":\"2015-01-21T12:56:52.000Z\",\"source\":\"[email protected]\",\"destination\":[\"[email protected]\"],\"messageId\":\"0000014b022222d2-c722222f-f610-4b56-1237-2e2222249521-000000\"}}",
          "Timestamp" : "2015-01-21T12:56:54.396Z",
          "SignatureVersion" : "1",
          "Signature" : "u7u/zeRG5KC3K7CpXllfwbrAGMqcHsp/01d3JAwxwPZYuOU22222222Gn9rZZTTxmy2vrIyioEpIXtCaT6MhjUum2erYBi0Doo8K03+IGtqsjQZeEwtr6cWDDJyrxoX53a18fp9YqBNTzwvu9TOkTqbumw9fH1+ltQ3qeDRP1DrpkJczQ080cZPmkF2xeDLlt5aIDlZJJkWpvivIrt9ZBS/lW4HU0UpjvHVAZhxgZyUoWuRMOM7j3q3aRh/RB9aHOOAw8wdfg5ie8vHSbcEOVIfOziENBEgYCctpVMgZDjdj2fakGfUM3kCVrgm983AjJt2SA==",
          "SigningCertURL" : "https://sns.eu-west-1.amazonaws.com/SimpleNotificationService-d6d679a1d2222222222e198.pem",
          "UnsubscribeURL" : "https://sns.eu-west-1.amazonaws.com/?Action=Unsubscribe&SubscriptionArn=arn:aws:sns:eu-west-1:863132222282:yourapp_email_complaints:0222222c-d183-45d8-b0ac-787222222084"
        }
      }
    end

    it 'creates a new complaint record' do
      expect {
        VCR.use_cassette 'check_sns_message' do
          post :complaint, complaint_json, format: :json
        end
      }.to change(EmailResponse, :count).by(1)
    end

    it 'saves the information it should' do
      allow(EmailResponse).to receive(:create)
      expect(EmailResponse).to receive(:create).with(hash_including(email: '[email protected]', response_type: 'complaint', extra_info: "complaintFeedbackType: abuse"))
      VCR.use_cassette 'check_sns_message' do
        post :complaint, complaint_json, format: :json
      end
    end

    it 'fails if it cannot verify the message' do
      expect {
        VCR.use_cassette 'check_sns_message' do
          post :complaint, invalid_complaint_json, format: :json
        end
      }.to change(EmailResponse, :count).by(0)
    end
  end
end
DB schema
# In a migration file in db/migrations. Use rails g migration to make one

class CreateEmailResponses < ActiveRecord::Migration
  def change
    create_table :email_responses do |t|
      t.string :email
      t.text :extra_info
      t.integer :response_type

      t.timestamps null: false
    end
  end
end
Model
# In app/models/email_response.rb

class EmailResponse < ActiveRecord::Base
  enum response_type: [ :bounce, :complaint ]

  validates_presence_of :email
end
Controller
# In app/controllers/email_responses_controller.rb

require 'json'

class EmailResponsesController < ApplicationController

  skip_authorization_check
  skip_before_action :verify_authenticity_token

  before_action :log_incoming_message

  def bounce
    return render json: {} unless aws_message.authentic?

    if type != 'Bounce'
      Rails.logger.info "Not a bounce - exiting"
      return render json: {}
    end

    bounce = message['bounce']
    bouncerecps = bounce['bouncedRecipients']
    bouncerecps.each do |recp|
      email = recp['emailAddress']
      extra_info  = "status: #{recp['status']}, action: #{recp['action']}, diagnosticCode: #{recp['diagnosticCode']}"
      Rails.logger.info "Creating a bounce record for #{email}"

      EmailResponse.create ({ email: email, response_type: 'bounce', extra_info: extra_info})
    end

    render json: {}
  end

  def complaint
    return render json: {} unless aws_message.authentic?

    if type != 'Complaint'
      Rails.logger.info "Not a complaint - exiting"
      return render json: {}
    end

    complaint = message['complaint']
    recipients = complaint['complainedRecipients']
    recipients.each do |recp|
      email = recp['emailAddress']
      extra_info = "complaintFeedbackType: #{complaint['complaintFeedbackType']}"
      EmailResponse.create ( { email: email, response_type: 'complaint', extra_info: extra_info } )
    end

    render json: {}
  end

  protected

  def aws_message
    @aws_message ||= AWS::SNS::Message.new request.raw_post
  end

  def log_incoming_message
    Rails.logger.info request.raw_post
  end

  # Weirdly, AWS double encodes the JSON.
  def message
    @message ||= JSON.parse JSON.parse(request.raw_post)['Message']
  end

  def type
    message['notificationType']
  end
end
Routes
# In config/routes.rb

post 'email_responses/bounce' => 'email_responses#bounce'
post 'email_responses/complaint' => 'email_responses#complaint'
Mailer intercept
# In config/initializers/invalid_email_interceptor.rb

class BouncedEmailInterceptor
  def self.delivering_email(message)
    if EmailResponse.exists? email: message.to
      message.perform_deliveries = false
    end
  end
end

ActionMailer::Base.register_interceptor(BouncedEmailInterceptor)
You may be tempted to just use a column in the user table for marking the email address as invalid or not, but you may end up having more than one bounce/complaint per email address, and the information might be very useful in knowing whether you want to unblock the address (server may be down, mailbox full, etc). You may also have multiple addresses per user over time, so a separate table is better.
Step 6: Add the HTTPS endpoint to your SNS topic
This is where you actually get the SNS topic to ping you app when a bounce happens.
Go back to the SNS section of the AWS console, and click on the bounces topic you created and
then click the Create subscription button. Choose https and enter https://www.yourdomain.com/email_responses/bounce.
Do the same for the complaints topic, altering the URL as appropriate.
Now repeat whatever action in your app will send an email to the bounce test address. You should find that a new record is created in the database. Repeat the action, and the logs should show that no email was sent this time.
Then do the same test for the complaints test address.
Once you're happy this works, remove the subscription that copies the emails to your personal email for each of the SNS topics, and you're all done.
Step 7: Ask AWS to enable production SES access.
Now that your app can handle bounces and complaints, you are OK to ask AWS to take you out of the sandbox and enable actual emails to be sent from your app. There are instructions on how to do this here.
All done!
That's it. You should be able to send transactional emails cheaply and easily now using the AWS infrastructure. Let's hope Amazon keep dropping their prices like they have done in the past!

How to add tests to legacy code so you can understand it quickly and start making changes with confidence
18 May 2015
Taking over legacy code can be challenging. There are a whole load of issues to deal with, ranging from understanding what on earth it's supposed to be doing, to fixing massive problems with the underlying architecture. So where to start and how can you make your life easier?
What I've learned after being in this position many times is that the most important thing to do right from the start is to work on the tests. Doing this helps for several reasons, and not just the obvious ones. Normally, we look at tests as a way to be sure that the system does what it is supposed to do, and continues to do so after we add features or refactor. But there are other benefits. If you have no idea what the code you are looking at is supposed to be doing in the first place, then tests can provide you with a valuable living documentation of what is expected of it. They may not be very good (or even exist at all), but this is the best place to start.
The process of adding, understanding or improving the tests is the best way I know of to get intimately familiar with a piece of code. Far more so than just reading the implementation as it stands. What if there are odd edge cases which are completely non-obvious when looking at the code, but which the tests make clear? What are the assumptions about what sort of data is going to be coming in to the system from outside? Why have things been put together in this way - are there certain contexts and use cases, which give us clues about likely reasons for future changes? What if the main class is a 4000 line lumpen mess and you don't know what half of it does? Whatever the question, understanding and improving the test suite will help.
This post shows how I did this with a recent project and provides some pointers to techniques that I found useful.
Making resque-scheduler-web (the example I'll be using)
As I outlined here, I recently extracted some code from Resque scheduler into a separate gem and converted it from a Sinatra interface to being a Rails engine.
The gem in question provides two extra tabs in Resque Web, so you can see what Resque Scheduler is up to. I thought this looked pretty straight forwards, but it soon turned out that there were a load of actions I didn't realise were there, which did stuff I didn't understand and then redirected somewhere else. I then found a load of other pages which didn't seem to appear in the navigation and could only be reached by clicking on links in the page content, so it was more complex than I expected.
Transferring the code into a Rails Engine meany rewriting the whole test suite, as the
original Test:Unit code was incompatible with Rails 4. I settled on Rspec for the new suite,
but had the daunting task of trying to work out how best to do this and how far to go.
Based on what I learned, here's
what I recommend you do if you find yourself in a similar situation:
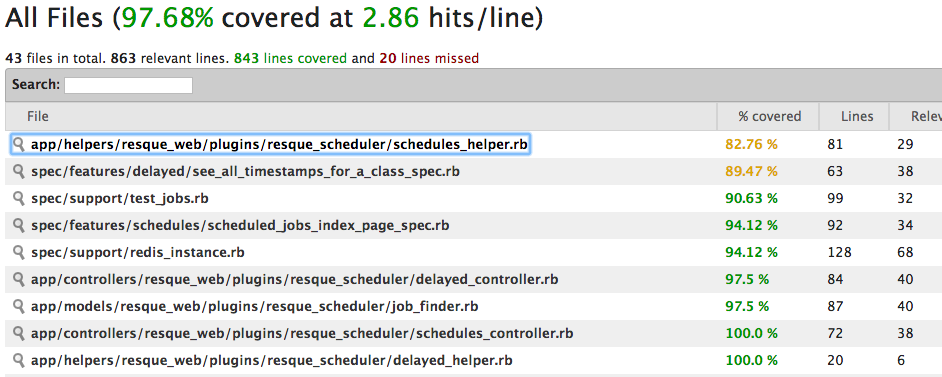
Step 1: Assess what tests are there using a coverage checker
This is important. If code is not covered by any tests, then don't touch it! You've no idea what you could break. There are a few ways to do this
Simplcov on the command line
Simplecov is a gem which creates a HTML
coverage report in the /coverage directory of your
project, which you can then open in the browser. It provides and overview of all the files, then
a line-by-line breakdown of what is covered and what is not.
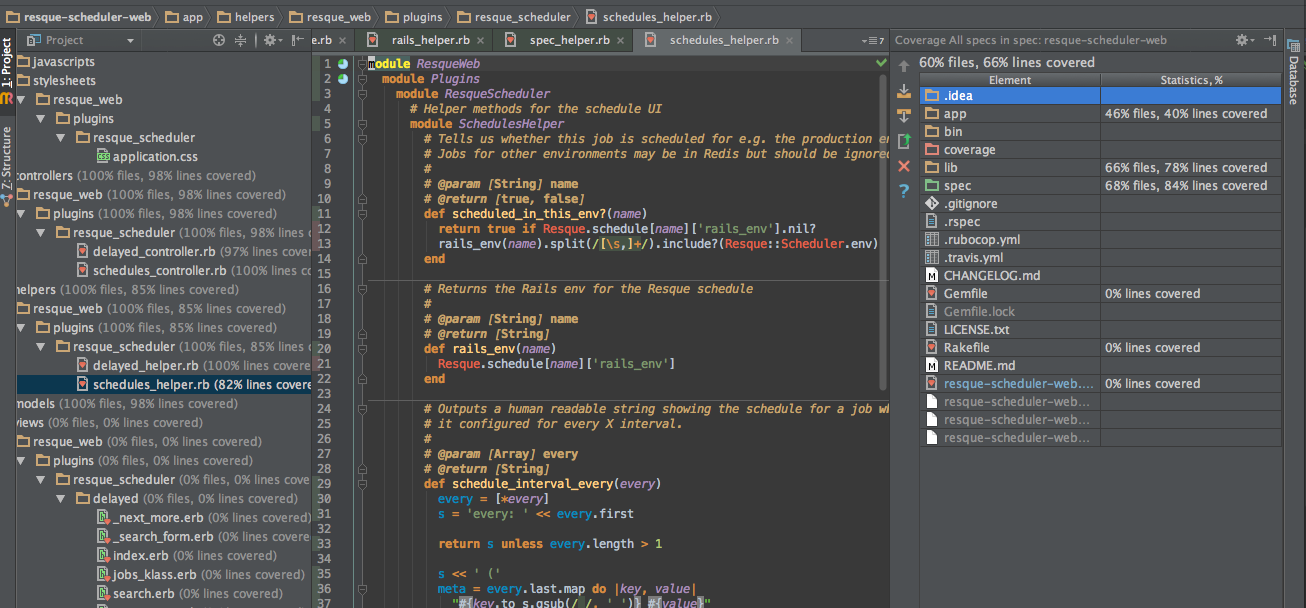
IDE coverage checker
If you're an IDE fan like me (I love Rubymine - with the Vim plugin of course), then you have the option of simply running the tests with the built-on coverage checker and seeing the output right there in front of you, with a subtle coverage indicator to the left of each line (under the line number).
Code climate via Travis
If your project is public and open source, then there's an online option availble: set up Travis
for running your tests (it will pull your code on every Github commit) and also set up
Code Climate to assess the quality metrics of your code for free. The codeclimate-test-reporter
gem will send the results of your test run to Code Climate, which will then show a nice
badge which you can embed anywhere you think is a good idea (Github readme?) so that pepople
can see how good your coverage is and know how awesome you are.
Warning: coverage percentages may not be what they seem to be
Your integration tests may be exercising lots of code pathways, making the coverage tool think that it's all being tested, but when we examine what the test is really asserting, there is no check to see if the expected action has actually occurred. For this reason, code coverage tools should be used with caution: If they say you have no coverage, then you definitely don't, and you know what to fix first. However, if they say you do have coverage and you are not familiar with the test suite, then be careful - you may not be as safe as you think!
For example, the tests could be exercising lots of code paths and only checking one result e.g. that the page returns a 200 response code. In this case, all of the code to generate all of the page elements and to carry out all of the work in that controller action will look like it is covered. In reality, almost anything could be happening (or not) and you have no idea if it's broken.
Here's an example
for the clear action from the original tests for the resque-scheduler-web Sinatra code:
context 'on POST to /delayed/clear' do
  setup { post '/delayed/clear' }

  test 'redirects to delayed' do
    assert last_response.status == 302
    assert last_response.header['Location'].include? '/delayed'
  end
end
Hmmm. There are no other unit tests covering this code at all, so it's a good thing I checked!
I later found out that this action is supposed to delete all of the currently scheduled delayed jobs. Not much in the test to indicate or assert this, though. This highlights how useful a comprehensive test suite would have been for onboarding new developers. It's not just about catching bugs!
Step 2: Read all of the existing tests
Seriously. All of them.
You may be lucky and inherit code with partial or even pretty good test coverage, but this doesn't mean you're OK to just trust them. The first thing to do is read them all so that you know what's there. There's just no way to know what you're dealing with otherwise, as we'll see.
To avoid the false impression of having thorough test coverage when you don't (as above), read and run each group of tests separately, with the coverage checker turned on. That way you can see exactly what's going on.
For unit tests, this means running the tests in one file, then going to the class it's testing and making a note of what is covered and what is not. However, this can still be misleading. Just because the code gets run once, does not mean that it is properly tested. You may need to test the code in more than one scenario. For example, if a method returns a boolean, then you need to test both a condition when it should be true and a condition when it should be false. Without this, a simple breakage that makes it return the same value all the time may not trigger any test failures. It's tempting to think that this would show up as a non-covered line in the coverage checker output for the method, but what if it looks like this?
def does_it_work?
  @some_var == 'some_value'
end
This tests the truthiness of a statement on a single line, so it looks covered even with just one test. But what if you mistype the comparison operator like this:
def does_it_work?
  @some_var = 'some_value'
end
This will always return true. If your single test only checks for a true outcome, you're in trouble. This shows that there is really no substitute for reading the test suite carefully as you work through it to see what's covered and what's not.
Integration tests require a different approach, as they exercise a lot of code without necessarily noting when the wrong thing happens, as we saw above. Here, your aim is to see how much of the user's happy path through the system is covered, so you can work out if more tests are required in order to catch regressions in future.
Take note: the ideal test suite for legacy code is not the same as when writing new code
OK, so now you should have a pretty good idea of what you've got to work with. If it turns out you have solid test coverage and need do no more, then congratulations! You're luckier than a lot of us :) However if you feel things could be be better, then you now need to work out what tests to add in order to be able to start maintaining or adding new features to the code. When I first started out, I thought that this would mean that I would need to try to get the test coverage to 100% so it would look the same as if I'd used behaviour driven development (BDD) from the start. Turns out, it's not that easy. With BDD, you start with the behaviour-specifying integration test (usually in Cucumber or one of its variants), then drop down into unit tests to make the components for your feature. This leads to both the happy path (and any important failure modes) being covered by Cucumber scenarios, as well as (theoretically) 100% unit test coverage. This is a great thing to aim for, but it can be very hard (or sometimes impossible) to retrofit onto existing code. There are several reasons for this.
1. What is the code even supposed to do??
One reason is that writing tests assumes that you know what the code is supposed to do in the first place. This is not always clear. Unless you have the original developer available to ask, you may unwittingly write tests which make assertions about the existing behaviour of code which has been broken for a while, without anyone one realising or fixing it. Just because it's there in the codebase does not mean it's necessarily bug-free. This is especially the case if it's untested, but test suites can sometimes be broken too. In this case, you would end up with a passing test suite for something that doesn't do what it's supposed to, masking the problem for the future.
This problem is often
relatively easy to get around with user scenarios/integration tests - just work through the same sequence
of actions in the browser and see if what happens makes sense. However, with unit tests it can be
extremely difficult to work out what the expected failure modes of any code are intended to be. Testing
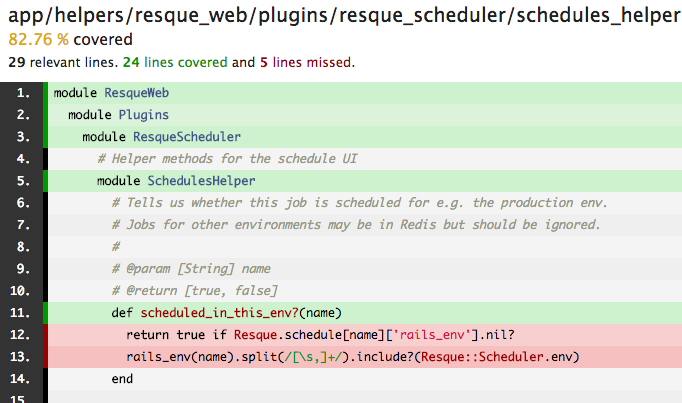
that it works when following the happy path is sometimes all you can do. For example, this method in
schedules_helper.rb in
in resque-scheduler-web (which outputs text for the UI based on the job's execution schedule) gives
us no indication of when 'Not currently scheduled' might be appropriate to display.
This line is currently not covered by any unit or integration tests, but what should a test that
covers this line look like? Without knowing how a job that is not scheduled could show up in the
scheduler interface, we are lost.
def schedule_interval(config)
  if config['every']
    schedule_interval_every(config['every'])
  elsif config['cron']
    'cron: ' + config['cron'].to_s
  else
    'Not currently scheduled'
  end
end
2. Maybe you just can't test it?
A further problem arises when the code in question has simply not have been written with testing in mind. For example, it may be hard to unit test a class in isolation if it has loads of dependencies or is poorly structured. Alternatively, you may have code that only works in conjunction with an outside system, or which requires a very complex environment to be set up. In the end, it might be that the only way to add tests is to refactor the code drastically, which has a big risk of introducing new bugs. Not a good thing to be doing if you are already unsure what the code really does and have no test coverage in the first place.
3. Do you have the time?
Writing the tests for new code using the TDD/BDD approach means you are only writing the code you need, and you know exactly what it does, so you can work pretty quickly like this. However, if you reverse the process to retrofit the tests to existing code, it takes far longer. You have to factor in the time required to work out what the code is doing, work out how it might go wrong, refactor so that the code is easier to test, etc. This is a much slower process and you simply may not have the time to go through line by line and do this for the whole codebase or even part of it.
All of this together means that we can't really expect to get the same level of coverage when adding tests to legacy code as we would have had if we'd followed the BDD route from the start. So what's the minimum we should we aim for? Well, this will clearly vary a lot from project to project depending on the circumstances, so a fair bit of judgement (or finger-in-the-air guesswork) is required, but there are a few good starting points. What follows is my personal rule of thumb for working out what tests you need:
Step 3: Add characterisation tests that cover all of the users' happy path
Michael Feathers introduced the term Characterisation tests to describe integration tests which aimed to characterise the behaviour of code as it stands, rather than to drive new feature development or provide documentation of the intended business case (as BDD does). The primary aim is to prevent regressions when you make changes to legacy code. In my view, this is the first thing you should do once you've assessed the state of the existing test suite. You don't necessarily know what the reasoning is behind a certain design decision, but you can certainly write an integration test that asserts the existing behaviour continues to be there. If you feel any are missing, now's the time to add them.
You can write integration tests with Cucumber, or you can stick with the same framework you are using for unit testing. Which is best? For resque-scheduler-web, Cucumber seemed a bit like overkill, as the key benefit it offers over Rspec is that the tests are readable by non-technical people. Not likely to matter much for a gem that's mostly only of interest to back-end developers, but your situation may be different. Choose cucumber if you envisage having conversations with non-technical people about the system's current or future behaviour. Stick to your favourite unit testing framework if not.
Another consideration with integration tests is that they run slowly compared to unit tests,
so it's worth thinking about whether you really need slower browser-driven tests or not. For resque-scheduler-web,
I switched the test suite to use Rspec and Capybara, and for the most part stuck with the
default :rack_test driver, which just parses the
generated HTML. There's no JavaScript in the UI for this project, so this was fine as only the HTML needed to be verified.
After adding/refactoring test to cover the whole of the happy path, I had 55 integration
scenarios to cover all of the actions in two controllers (and a few important failure modes). The test suite now
runs in just over 4 seconds on a high-end MacBook Pro. This is fine, and is unlikely change as the functionality
in the gem is pretty much complete and won't grow too much. However,
if you have a complex bit of code, you may find that your characterisation tests take quite some time to run either now or in the future.
For this reason, consider tagging them in some way so you can skip them and only run the faster unit tests whilst
developing new code. This is not necessary if using Cucumber of course, but with Rspec, you would need something like this:
it "a test tagged with the 'integration' tag", integration: true do
  # Test code...
end
Which allows you to skip the integration tests and run only the unit tests while you're coding, like this:
# On the command line in the root of the project

rspec . --integration ~skip
Or to run only the integration tests:
# On the command line in the root of the project

rspec . --integration
What about unit tests?
Characterisation tests both verify and document the behaviour of the system as you found it, so these are the tests you need as a minimum in order to be confident refactoring and adding new features. Given that all the user functionality should then be covered by them, unit tests to cover the same code are desirable, but likely not essential at this point. Another consideration is that any code which is lacking unit tests, but isn't going to change in the near future is unlikely to have new bugs introduced to it by changes to unrelated parts of the system. My approach is therefore to stop here and not try to add more unit tests for the sake of it. You just don't need them yet and the time trade off is often too much.
One exception I make is for unit tests that did not make much sense to you when I read over them in the previous steps. If they are hard to understand, then they may need to be simplified or refactored in order to help future developers (which usually means yourself in a few months time) to get up to speed quickly.
The future: Adding more tests during new development work
Later on, as you develop new features, you will (should) naturally be using the BDD cycle to drive your development, leaving lovely 100% covered code in your wake. However, you will also find yourself in a position where some refactoring of the legacy code is necessary at times. I think this is the point where unit tests are worth adding to the parts you are refactoring which lack them. Now that the legacy classes are being altered, there is a high chance of bugs being introduced during that process, so having fast unit tests to cover all possible regressions is worth the tradeoff.
How to make code snippets in your middleman blog look beautiful using highlight.js
6 May 2015
I started to blog with Middleman recently (this blog you're looking at is the result) and found that getting code blocks to embed and display cleanly was a bit of a pain. I tried a few different approaches which I wasn't happy with, before settling on the one you can see here, which I'm really pleased with. This post will explain how I did it and provide you with code you can use to achieve the same thing.
TBH, most of this is not specific to Middleman and may well be useful for other platforms too, but you'll have to work all that stuff out for yourself ;)
First, I tried to get the Syntax Highlighter javascript plugin that I had seen on Wordpress.org to work. This wasn't too hard to get going, but I didn't feel that the result was particularly pretty. Code is hard enough to make sense of on its own sometimes, so it's better to make it easy on the eye. Also, I like code and this is for my personal blog, so I was keen to find a way to make it beautiful rather than just functional.
Several other plugins later, I still didn't find anything that really looked right.
So, I started to look around for examples of websites with code that was formatted in a way that I liked looking at. I wanted clean, easy to read and pleasing to the eye. In the end, I concluded that the look I wanted was partly down to a good choice of font, font-size and highlight colours, but also due to removing extraneous clutter e.g. different background colors for alternate lines and a gutter with line numbers.
Do we really need line numbers?
Previously, I's always assumed that code blocks needed line numbers because code always has line numbers, but seeing how some sites don't use them at all (and look better for it) made me wonder if I really needed them at all. What do line numbers really achieve in a code snippet anyway? I suddenly realised I had no idea. The normal reason to have them is that you are navigating a large file and need to work out where you are so that you can get to the right place. However, this is not going to happen in a situation where you are deliberately cutting out small snippets of code to be read in isolation. If you need to refer back to a particular line, you are not likely to say "look at line 56 in the code above". You'd just add another snippet to the post to illustrate what you are saying.
By this point, I had found the highlight.js library and was trying it out. I really liked the look of the code it outputted, but would need to find a good colour scheme.
I tried to turn line numbers on in highlight.js to see what they looked like as a comparison, but found that I couldn't. The author had deliberately not written code to provide line numbers. Here's what he says about his decision:
One of the defining design principles for highlight.js from the start was simplicity. [...] The more fancy stuff resides around the code the more it distracts a reader from understanding it.
[...]
The only real use-case that ever was brought up in support of line numbers is referencing code from the descriptive text around it. On my own blog I was always solving this either with comments within the code itself or by breaking the larger snippets into smaller ones and describing each small part separately. I’m not saying that my solution is better. But I don’t see how line numbers are better either. And the only way to show that they are better is to set up some usability research on the subject. I doubt anyone would bother to do it.
Sold! No more line numbers for me. Also, it was clear that the library as a whole is deliberately written with simplicity and clarity in mind. My kind of code!
Installing highlight.js
You will need JQuery installed already.
Go to the download page and select all of the languages you will be using. This will give you a minified file called highlight.pack.js, which you can use as-is.
Put highlight.pack.js into
source/javascriptsAdd the highlight.pack.js file to the all.js manifest underneath JQuery:
//= require highlight.packAdd the following code to all.js under the manifest section:
$(function() {
  hljs.initHighlightingOnLoad();
});
Switch to Redcarpet as your markdown handler and enable fenced code blocks. This is so that you can specify the language. highlight.js has some language auto detection, but I've found it doesn't always work, especially for short snippets.
# In Gemfile

gem 'redcarpet'
# In config.rb set :markdown_engine, :redcarpet set :markdown, :fenced_code_blocks => trueAdd a code block to a post using markdown:
```ruby
class User < ActiveRecord::Base
end
```
Choosing a colour scheme
There are a whole load of themes that come with highlight.js, and I needed one that fit well with the general colour scheme for the blog. Clashing colours are not good, so given that the main colour I'd settled on was a kind of dark aquamarine blue, a light, yellow-tinted background for the code blocks seemed like a good choice. Yellow is blue's complementary colour, given that it is on the opposite side of the colour wheel, so they tend to work well together. This is an important principle when choosing a colour scheme. Randomly chosen colours often clash, but a few simple design principles and an understanding of the colour wheel can make things look good without much effort. This tool is great for finding good combinations quickly based on colour theory if you're in a rush.
As for the colours for the code elements themselves, my inner design nerd tells me that they should ideally be carefully chosen to complement one another as well. Ethan Schoonover's Solarized colour scheme caught my attention some time ago as by far the best attempt to do this, so I was keen to use it. It also conveniently has a pale yellow background colour as part of the light version of the theme. Perfect! Highlight.js has a solarized theme, but I found that the dominant colours for the languages I use most didn't always match the rest of the colour scheme. I fixed this by copying all of the CSS hex values into SASS variables, adding a post to the blog with examples from each of the languages I use, and then messing around with the default theme colours till I was happy.
Here's the final SASS code for both the variables and the altered default styles:
// In variables.scss

// Solarized
$solarized_base03: #002b36;
$solarized_base02: #073642;
$solarized_base01: #586e75;
$solarized_base00: #657b83;
$solarized_base0: #839496;
$solarized_base1: #93a1a1;
$solarized_base2: #eee8d5;
$solarized_base3: #fdf6e3;
$solarized_yellow: #b58900;
$solarized_orange: #cb4b16;
$solarized_red: #dc322f;
$solarized_magenta: #d33682;
$solarized_violet: #6c71c4;
$solarized_blue: #268bd2;
$solarized_cyan: #2aa198;
$solarized_green: #859900;
// In default.scss

@import "variables";

/*

Original style from softwaremaniacs.org (c) Ivan Sagalaev <[email protected]>

*/

.hljs {
  display: block;
  overflow-x: auto;
  padding: 0.5em;
  background: #f0f0f0;
  -webkit-text-size-adjust: none;
}

.hljs,
.hljs-subst,
.hljs-tag .hljs-title,
.nginx .hljs-title {
  color: black;
}

.hljs-string,
.hljs-title,
.hljs-constant,
.hljs-parent,
.hljs-tag .hljs-value,
.hljs-rule .hljs-value,
.hljs-preprocessor,
.hljs-pragma,
.hljs-name,
.haml .hljs-symbol,
.ruby .hljs-symbol,
.ruby .hljs-symbol .hljs-string,
.hljs-template_tag,
.django .hljs-variable,
.smalltalk .hljs-class,
.hljs-addition,
.hljs-flow,
.hljs-stream,
.bash .hljs-variable,
.pf .hljs-variable,
.apache .hljs-tag,
.apache .hljs-cbracket,
.tex .hljs-command,
.tex .hljs-special,
.erlang_repl .hljs-function_or_atom,
.asciidoc .hljs-header,
.markdown .hljs-header,
.coffeescript .hljs-attribute {
  color: $solarized_red;
}

.smartquote,
.hljs-comment,
.hljs-annotation,
.diff .hljs-header,
.hljs-chunk,
.asciidoc .hljs-blockquote,
.markdown .hljs-blockquote {
  color: $solarized_base01;
}

.hljs-number,
.hljs-date,
.hljs-regexp,
.hljs-literal,
.hljs-hexcolor,
.smalltalk .hljs-symbol,
.smalltalk .hljs-char,
.go .hljs-constant,
.hljs-change,
.lasso .hljs-variable,
.makefile .hljs-variable,
.asciidoc .hljs-bullet,
.markdown .hljs-bullet,
.asciidoc .hljs-link_url,
.markdown .hljs-link_url {
  color: $solarized_cyan;
}

.hljs-label,
.hljs-javadoc,
.ruby .hljs-string,
.hljs-decorator,
.hljs-filter .hljs-argument,
.hljs-localvars,
.hljs-array,
.hljs-attr_selector,
.hljs-important,
.hljs-pseudo,
.hljs-pi,
.haml .hljs-bullet,
.hljs-doctype,
.hljs-deletion,
.hljs-envvar,
.hljs-shebang,
.apache .hljs-sqbracket,
.nginx .hljs-built_in,
.tex .hljs-formula,
.erlang_repl .hljs-reserved,
.hljs-prompt,
.asciidoc .hljs-link_label,
.markdown .hljs-link_label,
.vhdl .hljs-attribute,
.clojure .hljs-attribute,
.asciidoc .hljs-attribute,
.lasso .hljs-attribute,
.coffeescript .hljs-property,
.hljs-phony {
  color: $solarized_violet;
}

.hljs-keyword,
.hljs-id,
.hljs-title,
.hljs-built_in,
.css .hljs-tag,
.hljs-javadoctag,
.hljs-phpdoc,
.hljs-dartdoc,
.hljs-yardoctag,
.smalltalk .hljs-class,
.hljs-winutils,
.bash .hljs-variable,
.pf .hljs-variable,
.apache .hljs-tag,
.hljs-type,
.hljs-typename,
.tex .hljs-command,
.asciidoc .hljs-strong,
.markdown .hljs-strong,
.hljs-request,
.hljs-status {
  font-weight: bold;
}

.asciidoc .hljs-emphasis,
.markdown .hljs-emphasis {
  font-style: italic;
}

.nginx .hljs-built_in {
  font-weight: normal;
}

.coffeescript .javascript,
.javascript .xml,
.lasso .markup,
.tex .hljs-formula,
.xml .javascript,
.xml .vbscript,
.xml .css,
.xml .hljs-cdata {
  opacity: 0.5;
}
Indentation trouble
I also found that I had an issue with the indentation of the code inside the blocks. What I was seeing was this:
class Product < ActiveRecord::Base
          searchkick
        end
Which is weird. Why would the first line be OK and the rest all pushed to the right? I looked at the source code for the page and found this:
                  <pre>
            <code class="ruby">class Product < ActiveRecord::Base
              searchkick
            end
            </code>
        </pre>
Ah. That makes sense. The way a <pre> block works is that all of the whitespace is preserved, unlike the usual situation
where the browser compresses all the gaps down to single spaces.
Because the HTML had been generated by Middleman from markdown posts, the code was not aligned with the left side of the document in the raw HTML,
but to the left of the <code> tag. All except the first line that is, which was right up against the <code> tag.
The syntax highlighter treated this like deliberate indenting and included all the whitespace to the left of the <code> tag,
shifting all of the code apart from the first line to the right. This is correct behaviour as far as the highlighter goes
because the <pre> tag should be really used like this:
                  <pre>
            <code class="ruby">
class Product < ActiveRecord::Base
  searchkick
end
            </code>
        </pre>
However, the markdown/templating system in Middleman wasn't playing ball. I tried changing the markdown engine a few times, but none of them did things the right way.
After trying all sorts of hacky work-arounds in the markdown code, I found a
small JQuery plugin that would take the poorly aligned
<pre> tag content and fix the whitespace in it before the syntax highlighter
did it's job. I made a few tweaks to this, and in the end it worked perfectly, so
if you need the same fix, add the code below to a file which you include in your project:
(function ($) {

  "use strict";

  $.fn.prettyPre = function (method) {


    var defaults = {
      ignoreExpression: /\s/ // what should be ignored?
    };

    var methods = {
      init: function (options) {
        this.each(function () {
          var context = $.extend({}, defaults, options);
          var $obj = $(this);
          var usingInnerText = true;
          var text = $obj.get(0).innerText;

          // some browsers support innerText...some don't...some ONLY work with innerText.
          if (typeof text === "undefined") {
            text = $obj.html();
            usingInnerText = false;
          }

          var lines = text.split("\n");
          var line = '';
          var leadingSpaces = [];
          var length = lines.length;
          var zeroFirstLine = false;

          /** We assume we are using codeblocks in Markdown.
           *
           * The first line may be right next to the <pre> tag on the same line,
           * so we want to ignore the zero length spacing there and use the
           * smallest non-zero one. However, we don't want to do this
           * if the code block is correctly placed up against the left side.
           */
          for (var h = 0; h < length; h++) {

            line = lines[h];

            // use the first line as a baseline for how many unwanted leading whitespace characters are present
            var currentLineSuperfluousSpaceCount = 0;
            var TotalSuperfluousSpaceCount = 0;
            var currentChar = line.substring(0, 1);

            while (context.ignoreExpression.test(currentChar)) {
              if (/\n/.test(currentChar)) {
                currentLineSuperfluousSpaceCount = 0;
              }
              currentLineSuperfluousSpaceCount++;
              TotalSuperfluousSpaceCount++;
              currentChar = line.substring(TotalSuperfluousSpaceCount, TotalSuperfluousSpaceCount + 1);
            }
            leadingSpaces.push(currentLineSuperfluousSpaceCount);
          }

          if (leadingSpaces[0] === 0) {
            // If we have this:
            //     <pre>Line one
            //     Line two
            //     Line three
            //     </pre>
            leadingSpaces.shift(); // Remove first count
            zeroFirstLine = true;
          }
          if (leadingSpaces.length === 0) {
            // We have a single line code block
            leadingSpaces = 0;
          } else {
            // Smallest of the leading spaces
            leadingSpaces = Math.min.apply(Math, leadingSpaces);
          }

          // reconstruct

          var reformattedText = "";
          for (var i = 0; i < length; i++) {
            // cleanup, and don't append a trailing newline if we are on the last line
            if (i === 0 && zeroFirstLine) {
              // If the first line was butted up the the <pre> tag, don't chop the beginning off.
              reformattedText += lines[i] + ( i === length - 1 ? "" : "\n" );
            } else {
              reformattedText += lines[i].substring(leadingSpaces) + ( i === length - 1 ? "" : "\n" );
            }
          }

          // modify original
          if (usingInnerText) {
            $obj.get(0).innerText = reformattedText;
          }
          else {
            // This does not appear to execute code in any browser but the onus is on the developer to not
            // put raw input from a user anywhere on a page, even if it doesn't execute!
            $obj.html(reformattedText);
          }
        });
      }
    };

    if (methods[method]) {
      return methods[method].apply(this, Array.prototype.slice.call(arguments, 1));
    }
    else if (typeof method === "object" || !method) {
      return methods.init.apply(this, arguments);
    }
    else {
      $.error("Method " + method + " does not exist on jQuery.prettyPre.");
    }
  };
})(jQuery);
And to actually trigger the highlighting:
$(function() {
  $("PRE CODE").prettyPre();
  hljs.initHighlightingOnLoad();
});
Word wrap
This seemed great except for one last problem: the lines of code were wrapping inside the code blocks. This is not good, as code is very hard to read (and may not work) if not presented exactly as it is normally written. Line breaks matter! After a load of digging around, it turned out that Bootstrap was to blame. removing the Bootstrap CSS include from the all.css file fixed it.
If you really need to use Bootstrap, then you can use the following CSS to reset the styling for just the code blocks, leaving the rest of the document intact:
pre {
    padding: 0;
    white-space: pre;
    word-break: normal;
    word-wrap: normal;

    code.hljs {
        padding: 2rem;
        overflow:  auto;
        max-height: 80rem;
        white-space: pre;

        &,
        span {
            font-size: 1.6rem;
            font-weight: 500;
        }

        span {
            white-space: pre;
        }
    }
}